
This documentation is intended to give a step-by-step guide on how to transfer files to and from Globus personal collections (formerly known as personal endpoints) and the Blackmore SMART FIRES data lake share. This process will allow you to upload copies of your own data to the data lake for sharing and backed-up, long-term storage, and will allow you to download data from the data lake for use in your research.
This guide assumes that you have already downloaded and installed Globus Connect Personal, set up a personal collection on the computer you use, and that the Globus Connect Personal (GCP) application is currently running. Documentation for Getting Access and setting up a Personal Endpoint can be found here.
Transferring Files between a Personal Collection and the Data Lake
Overview: The steps for transferring files from the data lake to your personal collection are the same as transferring from your personal collection to the data lake, though with two variable choices depending on which way you are transferring:
- Using the two-pane option described in subsequent steps, first select the Collection/Path of the destination collection in one pane. Then in the other pane select the Collection/Path for the collection of origin. Lastly, select the files you want to transfer from the collection of origin.
- Press the blue start button under the collection of origin to begin a transfer.
NOTE: The transfer process will overwrite any files at the destination that have the same name as the incoming file
Steps:
- Log in to globus.org and set the Globus window to the two pane (middle) option in the ‘Panels’ selection in the upper right.
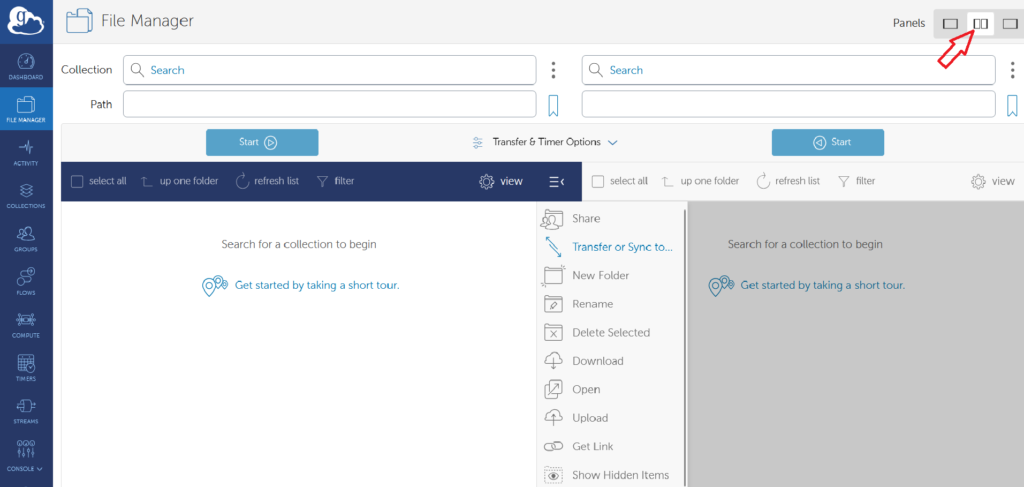
- Click on ‘File Manager’ in the top left (if it is not already selected). In one pane, find your destination collection. Click in the ‘Collection’ search bar, and search and select or browse to your destination collection: either your personal collection or the ‘smart-fires’ collection, in this example. This is where you will add files. Your personal collection will have the same name that you chose during the installation process and can be found in the “Your Collections” tab that pops up when you place your cursor in a “Collection” search bar. Selecting your personal collection will bring you to the default directory for that collection. From here you can browse to find the files you want to transfer.The data lake can be found in the “Shared With You” tab after clicking on a Collection search bar – it is the “smart-fires” collection.
- In the second pane, search for and select your origin collection.
- Navigate the path of your collection of origin to find and select the files or folders you wish to transfer.
- Once you have selected the files and folders for transfer (by placing a tick in the blue box to the left of the item), confirm your destination collection is correct. Note that the transfer process will overwrite any files at the destination that have the same name as the incoming file, so be careful not to accidentally overwrite files you need by using unique names for files, or by using a staging folder for all transfers. Click on the blue ‘Start’ button in between the “Path” bar and the file area of the collection of origin. Globus will copy your files into the selected destination collection directory.
- For small transfers, confirm your files have transferred correctly by visiting the Activity page in the left sidebar menu. For larger transfers requiring more time, see the Globus instructions to “Confirm transfer completion”